Saturday 24 April 2021

Wednesday 7th April 2021 Hippo Happiness

 Still catching up with my back log of lack of blogging

On Wednesday 7th April I shared on my weekly Facebook live a cube card using Hippo Happiness stamps and the pattern play dsp. Sorry I haven't captured a photo of the card but here is one I made for a 21st.

These cube cards are really simple to construct. You need to create 2 smaller cubes and one double the size cube and the 2 smaller adhere to the larger and fold up to go in an envelope,


I run weekly classes that focus on a new fancy fold card and this is one of the folds we have made.

Here is a link to a pdf instruction sheet.


Link to Facebook live 


Wednesday 31st March Using the flowers for every season dsp

 Evening all 

I'm so sorry I have been remiss with my blogging, 

This is the details of the Facebook live I did on 31st March 2021

Facebook live 31/03/21

Hopefully I've remembered the correct cards I made on the live. I used the flowers for every season paper to make dome quick cards.

All were standard A6 cards (21 x 14.8cm folded at 10.5cm).

I cut the dsp at 14.3 x 10cm and adhered to the fromt of the card. using the oval occasions stamps I stamped sentiments and punched with the coordinating punch. To create a layering look, I used coordinating card for the base layer of the sentiment.

My top tip for the double oval punch is to cut strips of card at 3 and 3.5cm wide depending if you want the small oval or the scalloped oval and this reduces waste card.

I hope you like this quick recap.


shop items used in this project Shop now


Floating and fluttering colour combo Wednesday 21st March

 Hi and welcome to my run through of Wednesday nights live.

I used a colour combination and a stamp set called Floating and Fluttering that is available in the January to June 2021 Mini Catalogue from Stampin Up.


These are the 3 colours I chose I also added Mossy Meadow as a neutral and my card base was Basic White


This is the card I created, I started with a standard A6 portrait folded card (29.7 x 14.8cm folded at 14.8cm). I added a 14.8 x 5cm strip on in colour dsp in cinnamon cider. On a scrap piece of basic white I stamped the outline of the butterflies in Early espresso ink . The stamp is one large out line and stamp and there is a die that coordinates to cut them out. The floating and fluttering stamps have 2 and 3 steps to enable quick and easy colouring in. The stamp that colours the whole background colour for each butterfly I inked up with Petal Pink ink and the detail colour stamp I used cinnamon cider. For the leaves I used mossy meadow stamped off to fill the colour.
The die set that coordinates with the Floating and fluttering stamps has 2 out line dies for the main image and a label die plus dies to cut the individual elements. The main outline die leaves all the elements connected and I thought this reminded me of old fashioned victorian scraps used for decoupage. Although I like that I decided to snip the elements apart.
I used my stamparatus to stamp the label in early espresso directly onto a pre cut label. I find that this is the best way for me to get it lined up properly. I can cut more labels from a sheet of card without too much waste by using this method and each label is perfectly line up each time. I also found if I missed inking the stamp properly I could re stamp any missed edges again saving card. Perfect for batch making.

I arranged the butterflies and leaves on the label, gluing some pieces flat and raising others on dimensionals, I then attached the label to the card as shown using dimensionals. In the bottom corner I added some enamel dots in cinnamon cider . I didn't add a sentiment as I decided this style of card could work for several occasions so could decide at a later date and I would add the sentiment just below the main focus.

I hope you enjoyed my little card this week and are encouraged to give the colour combo a go. Here is the link to my Facebook live show casing this card


The Floating and fluttering Stamp/ diess are only available until the end of June 2021 or while stocks last.

Here is the link to some of the products I used


Sunday 11 April 2021

April's Masterclass round up

 Wow what a class I have just held, so many new faces and some great makes.


Sunday 11th April 2-4pm was a masterclass to explore one sheet wonders.

We used the following templates

Template one
This was what I used for standard A 6 cards and I made 8 cards. The 2 rectangle on the second row were cut diagonally.


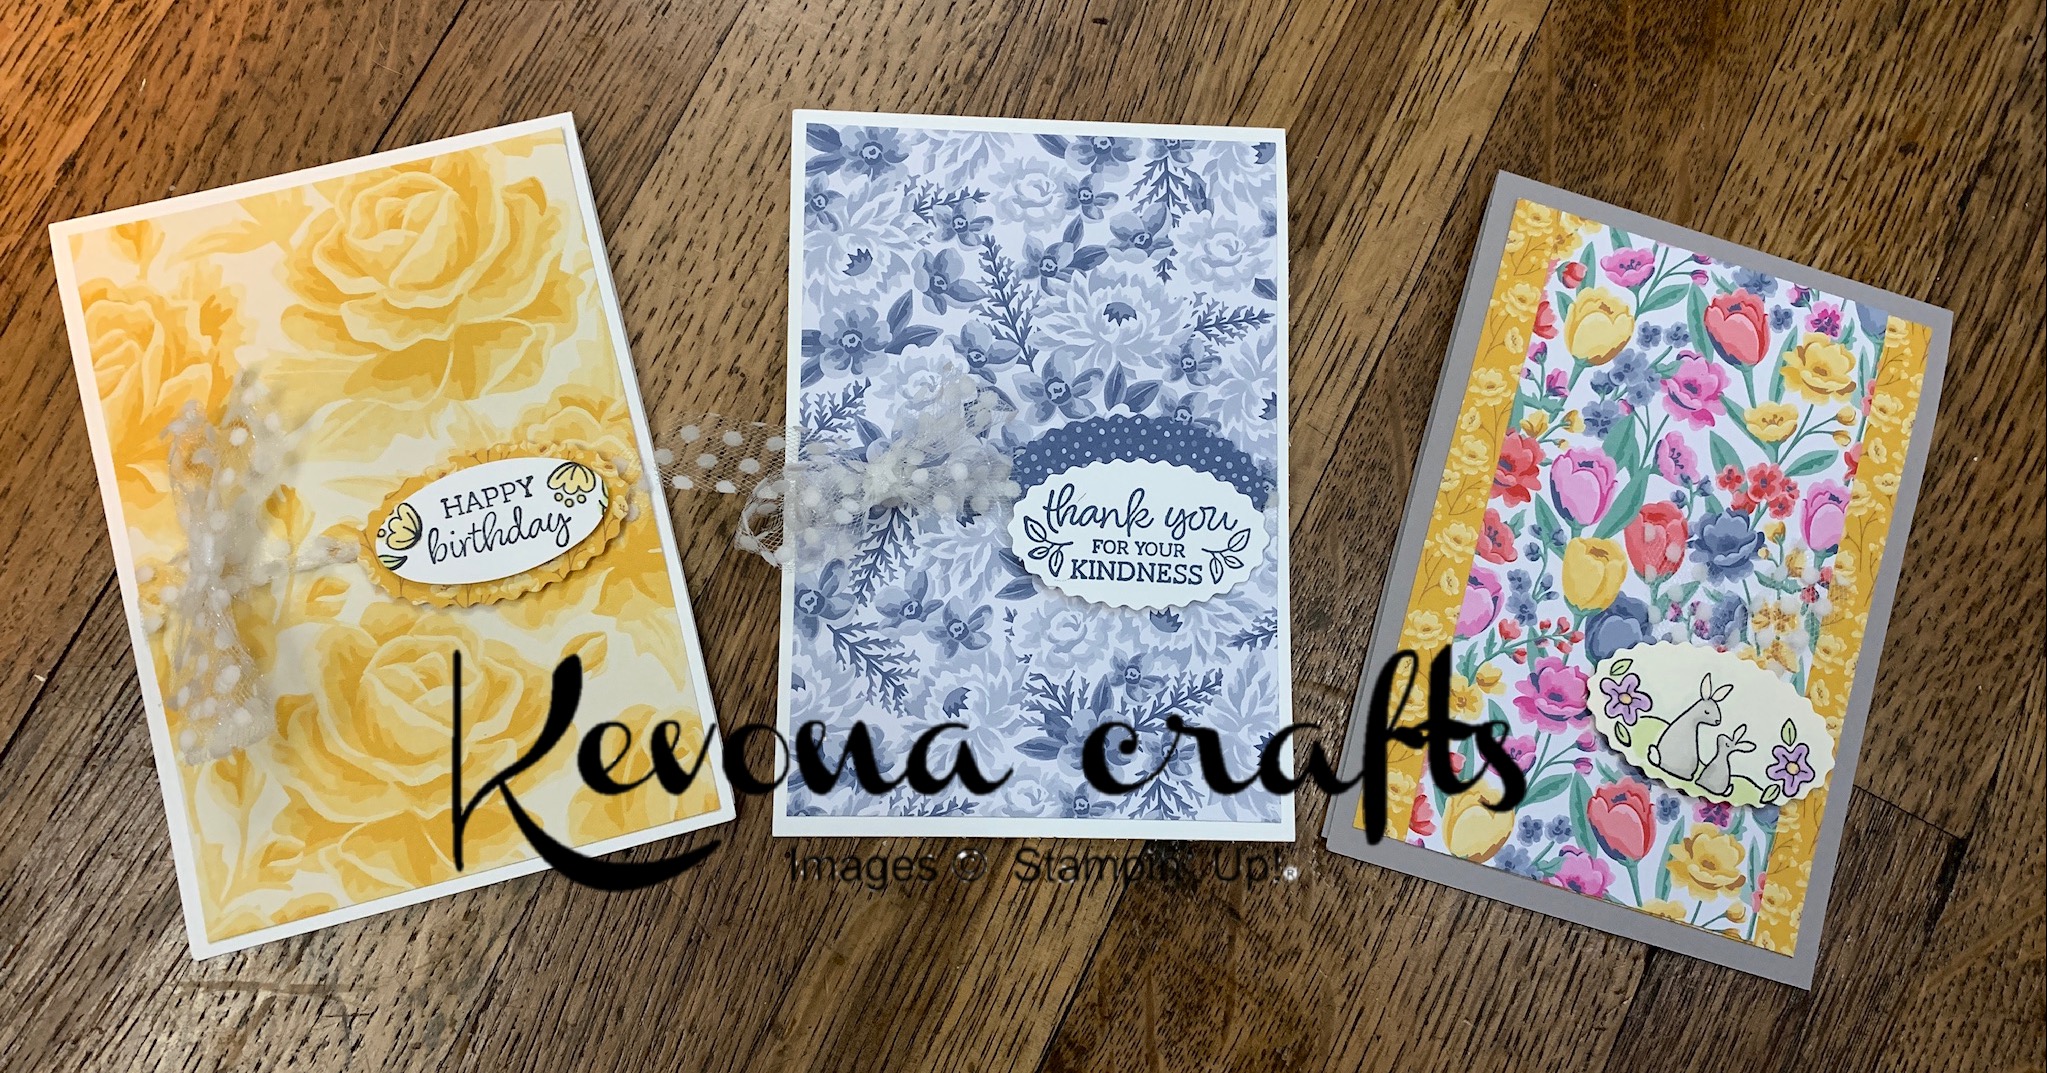
I used the playful pets designer series paper item 152489 along with some ribbon from my stash and sentiments from the following sets.
Hey Birthday Chick ( item code 154464)
So sentimental stamps and dies  (153828)
Free as a bird ( 149468)
You are amazing ( 154534)

I started with a sheet of 12 x 12  playful pets designer series paper, the one with the bowls and toys on, I then cut it up by first cutting the horizontal lines, and then cutting the vertical lines, be sure to keep the rectangles together and to be aware of any paper that has a direction.
For each card I took a cut piece of the playful pets designer series paper and adhered to a standard A6 card front, I addd further images from the other sheets in the paper pack ( I particularly like using the animals that were on the edge of the paper) and sentiments on labels cut with  the stitched so sweetly (151690) or the hippo and friends (153585) dies 

The great bit of using Stampin' Up!'s  designer series paper is that it is double sided so cutting the pieces as in the layout means you can see both sides, or either side. 

This technique allows you to make several cards, you can even just assemble the backgrounds and add sentiments later. Perfect for when you need that emergency card, you know the one you forgot to make and its needed right now, well a stash of these to hand is great. And although similar they aren't quite the same.

This is the second layout was to enable us to use some of the silvered foil edged cards that were on the clearance rack at a bargain price, although no longer available if you have some of these card bases in you stash than this is a great way to jazz them up. if you don't have these cards then you can still use this layout on standard A6 cards by using colour card mats behind.
Again I started by cutting  horizontally then vertically you can see the diagonal lines on this layout too.
It is important to keep the pieces together especially the thin strips as you will put them together like a jigsaw later, I recommend popping a piece of low tack tape over then to keep them together in the right order.
These are the cards I created along with several ladies who joined my zoom crafting afternoon ( I always say ladies but we do have a couple of men that sometimes join in my classes are open to all its just this month there were only ladies as the gents were busy gardening or working)
For these cards I used the True love designer series paper that is available in the January to June 2021 mini catalogue ( 154281)
I also used the silver foil edged card bases and envelopes, sadly these are no longer retired but you may have them in your stash.
Originally I planned the layout to make 11 cards but splitting the triangles up meant I made 12 cards.
The sentiments I used are from 
Peaceful Moments (151595)
So sentimental stamps and dies  (153828)
Free as a bird ( 149468)
You are amazing ( 154534)
Even though the True Love designer series paper is very floral I managed to create some masculine cards by which sentiment styles I used and using the other side of the paper. 
I also coloured and fussy cut flowers from some of the other sheets in the same paper pack, I used blackberry bliss light and dark blends, old olive light and dark blends and a touch of so saffron dark blend,
I used the label me fancy punch 151297 

I think these turned out rather nice

I hope you enjoyed reading my how too and that you will give making these cards a go.

For more images please follow me on Facebook, Instagram and Pinterest